← Back to PhysioQ Academy
Setting Up Your Research With Labfront By PhysioQ
.png)
Learn how to create a LabFront account, set up a project, and invite participants to join your project.
1. Sign up for an account
Visit Sign up for an account and sign up for a Free LabFront account. For security purposes, you will need a valid email address and phone number to complete the signup process.
Note: Free accounts are limited to 1 participant for each project, if you need to upgrade your account for multiple participants, please contact support@physioq.org.
2. Create a project
Once you have successfully created your account, please visit Sign in to LabFront and sign in to your account.
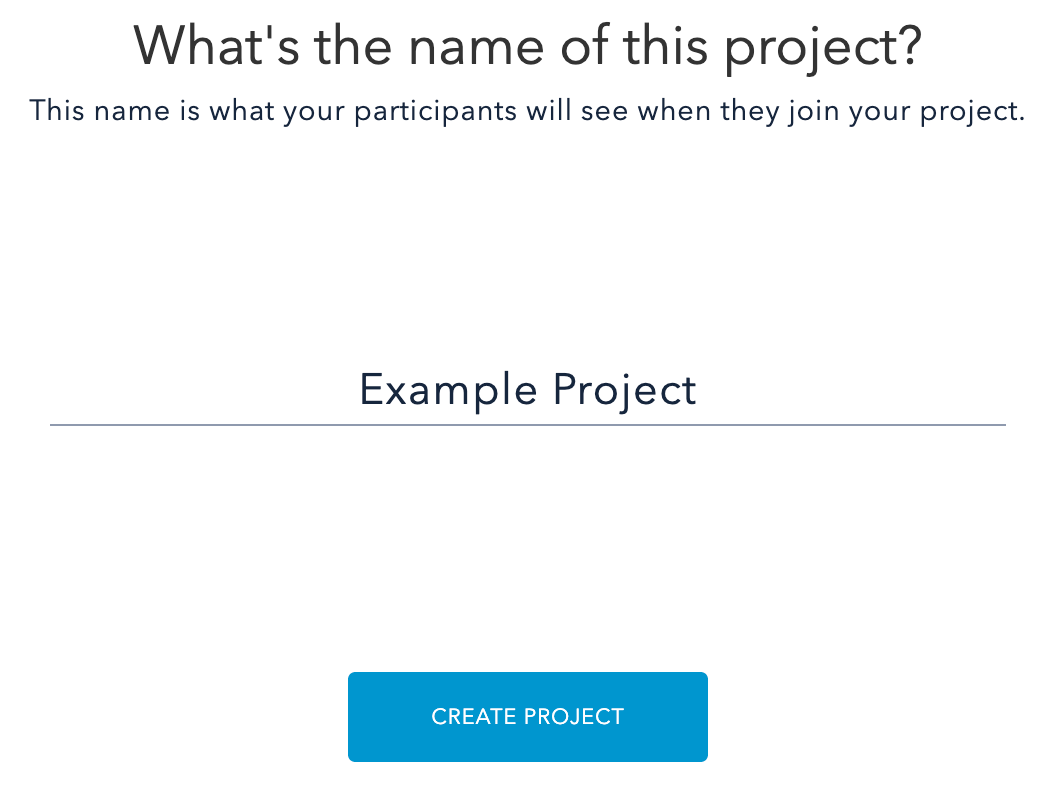
Next, you need to create a new project. Select CREATE NEW PROJECT.

Give your project a name and select CREATE PROJECT.
2.1 Enter project details
You will need to provide information about your project to your participants. This will be the first thing participants see when they open your project using the PhysioQ Connect app.
Under Set Up Project Details select START.

Enter the PROJECT NAME, PRINCIPAL INVESTIGATOR, HOST/INSTITUTE OF PROJECT, and the PROJECT DESCRIPTION. Once you have entered all of this information, select DONE.

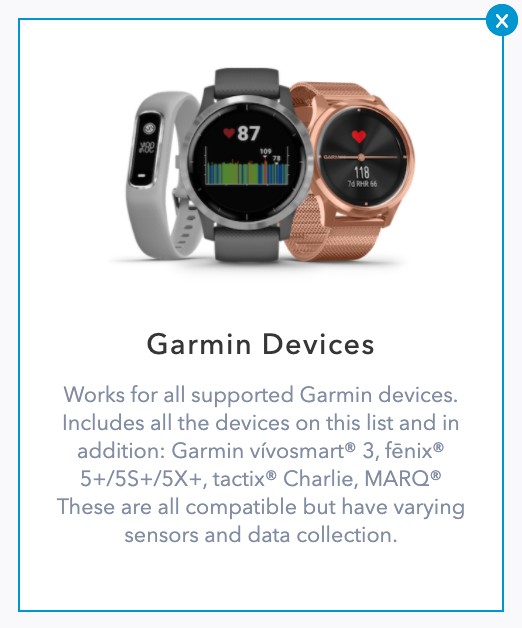
2.2 Select the Garmin research device
The next step is to choose Garmin devices as the research device you will use for collecting the physiological data.
Under Select research tools select START.
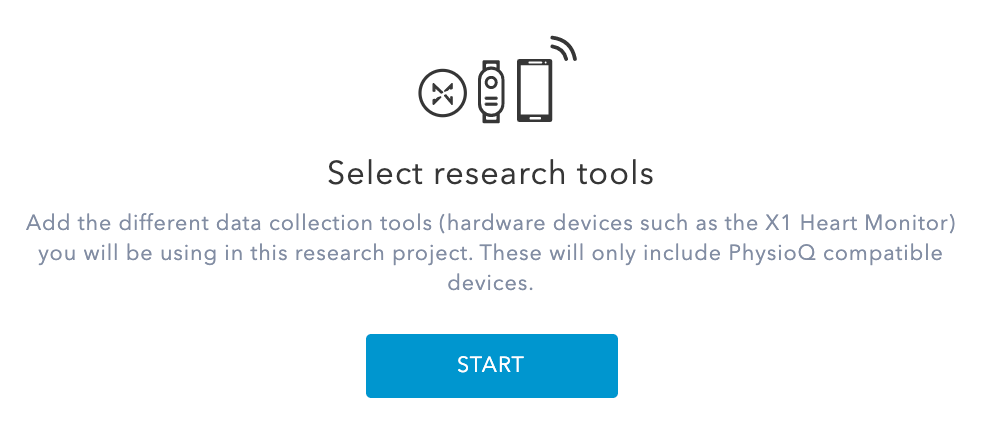
Choose Garmin Devices and select DONE.
Note: In a later step, you will choose exactly what type of physiological data you will collect such as steps, heart rate, or Stress.
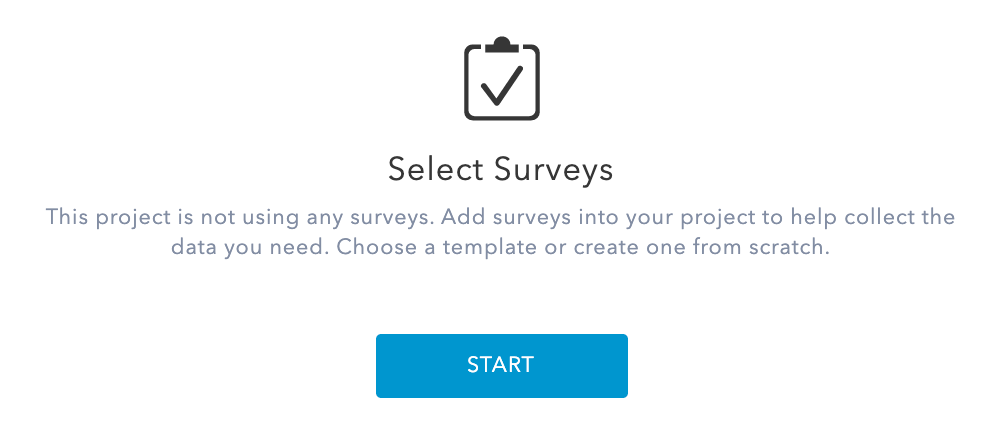
2.3 Create surveys (if applicable)
If you want to create surveys (questionnaires) for your participants to complete during the project then you will need to create the surveys. You can create new surveys from scratch, select from existing surveys from your previous projects or select from one of the existing LabFront surveys. LabFront survey creator supports text input, multiple-choice, and multiple selection questions.
The advantage of using LabFront Surveys is that you can use the real-time Dashboard to monitor whether participants have completed surveys. You can also download each participant’s survey data along with the physiological data, so your data is all in one place. For this reason, we recommend migrating your existing surveys into LabFront.
Under Select Surveys select START.
Select one of the following options
- Create your form - To create new Surveys from scratch
- My Global Survey Templates - To select from your existing Surveys
- PhysioQ’s Survey Templates - To select from existing LabFront Surveys
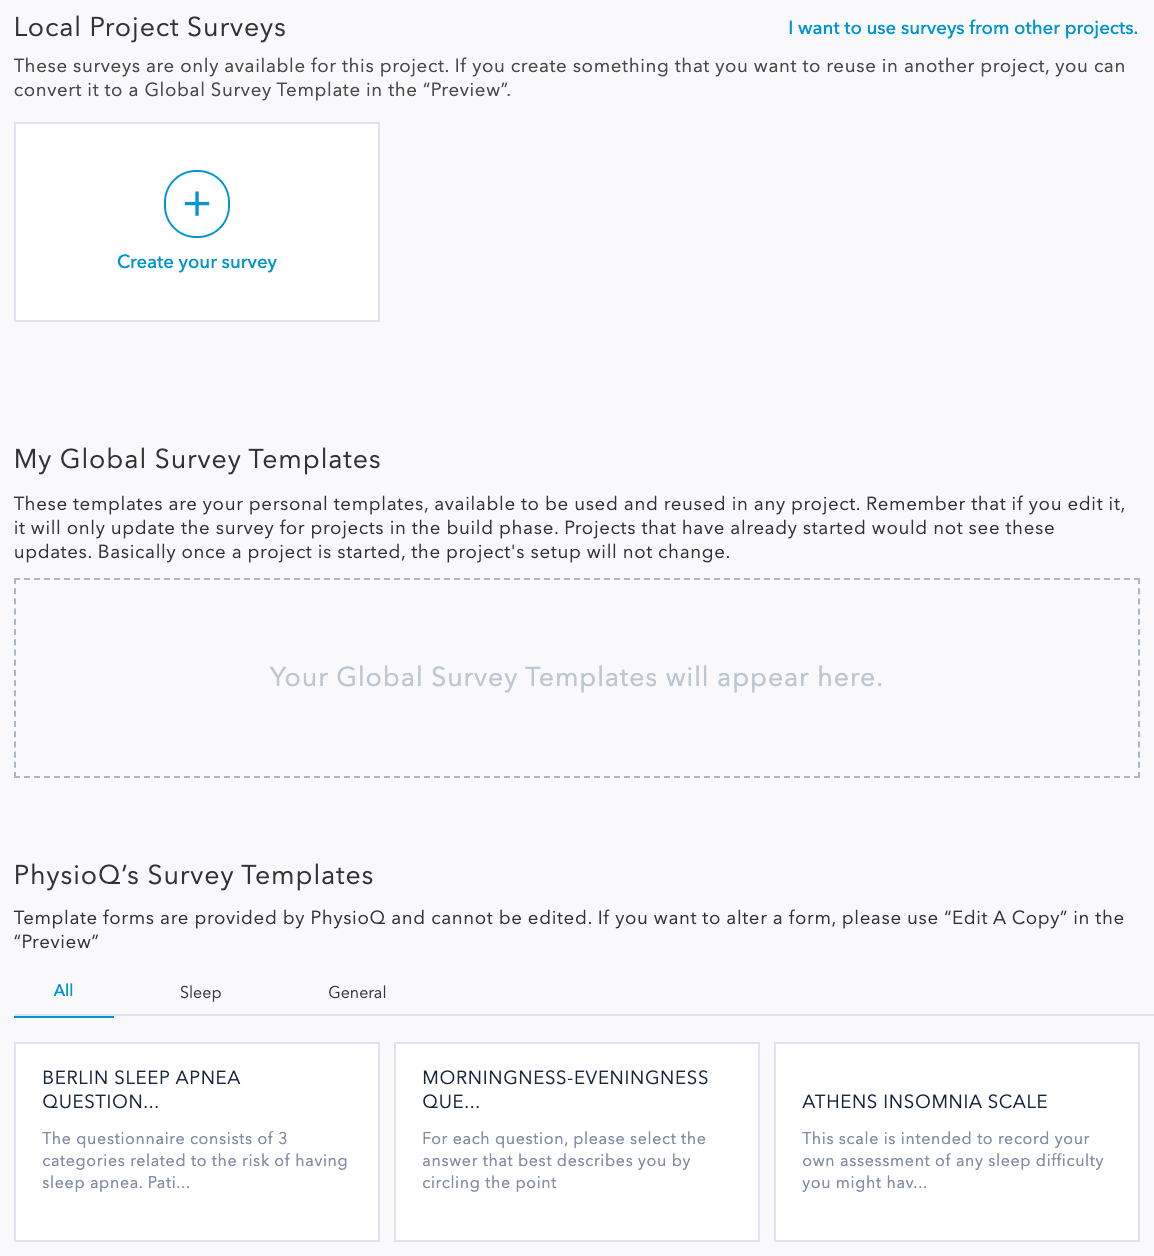
Once you have set up your surveys select DONE.
2.4 Set up participant tasks
The next important step in setting up your project is to create Tasks for your participants. The Tasks you need to create will normally correspond with the research protocol for your project. The most common types of Tasks you’ll want to create are To-do Tasks or Surveys.
To-do Tasks are simple tasks or activities that the researcher would like the participants to complete. These tasks are displayed to participants within the PhysioQ Connect app.
An example of a To-do Task might be to complete an exercise activity each day according to your research protocol. To-do Tasks can be one time only or repeatable throughout the duration of the project.
Another type of Task is a Survey Task, you should create Survey Tasks if you need your participants to complete one or more surveys during the project. For example, at the beginning of your project, you may want a simple survey to collect information from participants such as their name, address, or age. Or another example would be a mood survey that you’d like them to complete each day. Survey Tasks can be one time only or repeatable throughout the project. For more information on how to create surveys, please refer to section 2.3 Create surveys.
To create Tasks, under Setup Participant Tasks select START.

First, enter some General Instructions for participants, this should be some brief instructions for participants, such as making sure they complete all tasks or providing your contact details in case of questions during the project. And don’t forget to press the

to save any edits to the General Instructions.

The next step is to select ADD TASK to create a new Task.
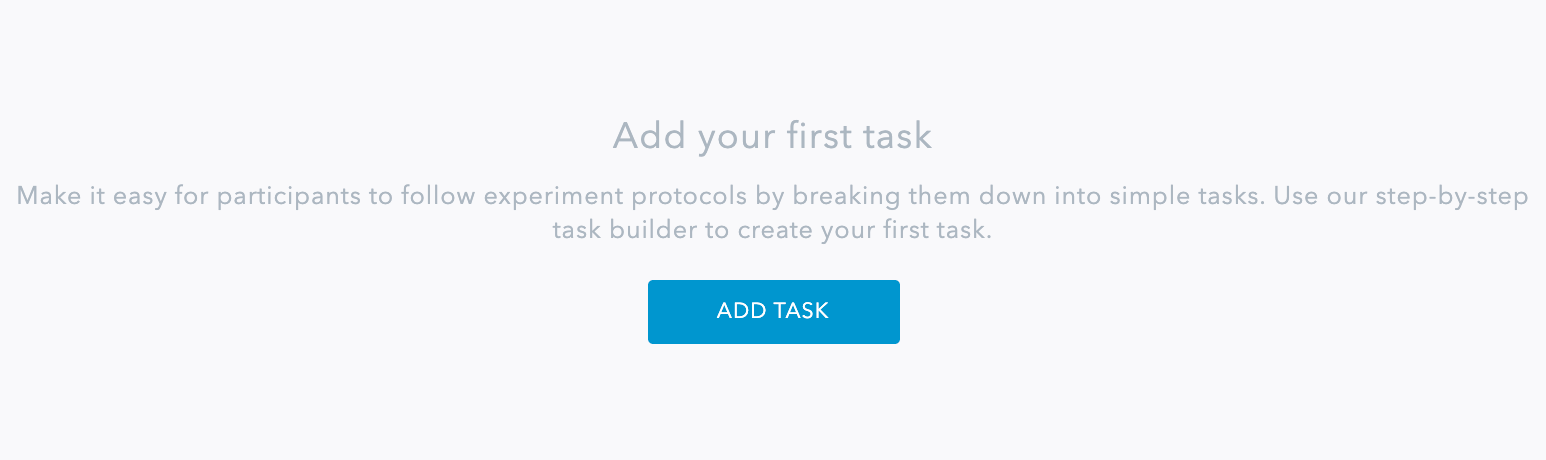
You should then provide the following information:
- TASK NAME - Choose an easy-to-understand name for this Task
- SCHEDULE - Is this Task repeatable or one time only?
- When should the participant complete the Task? - For example, At the beginning, or Once every day.
- TASK DESCRIPTION - Provide a brief description of the Task
- TASK TYPE - Choose the type of Task either a To-do task, Device Task, or Survey Task
Once you have set up your Tasks select SAVE.
Within Setup Participant Tasks you can see a preview of what the PhysioQ Connect app will look like from the Participant’s perspective. The app is intended to guide participants through your project according to the Tasks for your research project. You can re-order the Tasks according to how you’d like them to appear to participants in the app.
Please note that you can create a Task-Set which groups a set of individual Tasks that should be completed together. For example, you could create a Task-Set called Daily Breathing Exercise that consists of two Tasks Complete 5-minute Breathing Exercise and Answer Mood Survey.
For more information on the participant experience, please refer to the Invite Participants section of this article.
2.5 Choosing what physiological data to collect
The final important step in Tasks is to choose what type of physiological data you want to collect.
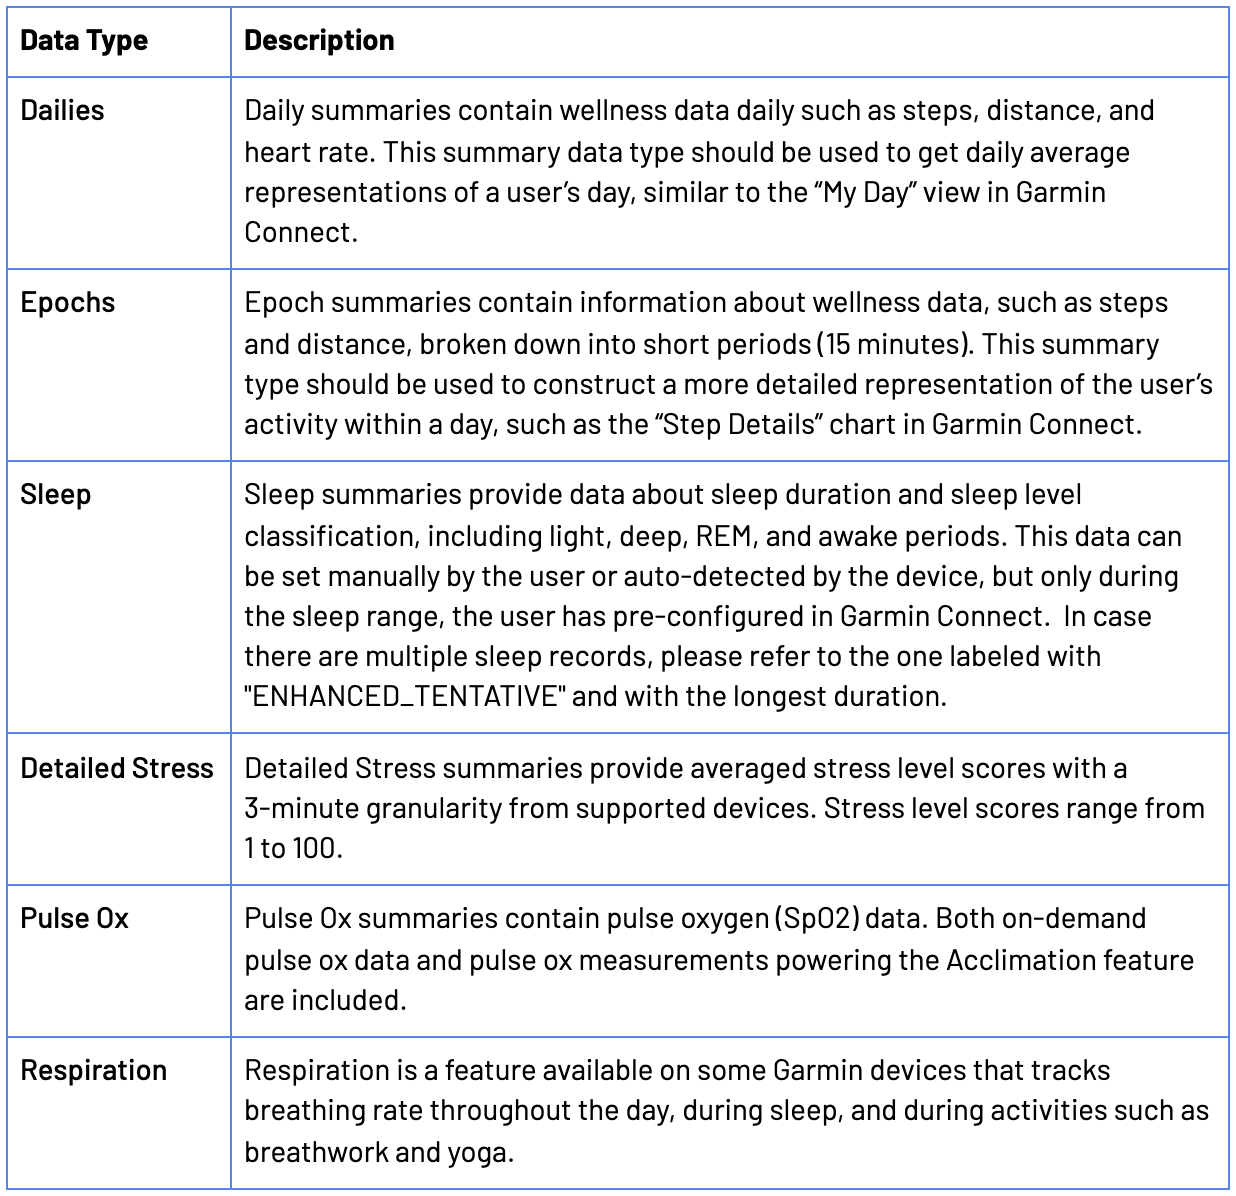
Garmin Connect Physiological Data - For most projects we recommend collecting Garmin Connect data only. This includes the essentials such as heart rate (minute by minute), steps, calories, sleep, respiration, body composition as well as detailed stress, pulse-ox, and epoch summaries for all-day activities.
To collect Garmin Connect data, make sure that Continuous monitoring is active is enabled in Continuous Background Data Collection.

Device Direct Physiological Data - Depending on the type and duration of your research project, some researchers require more detailed physiological data such as the beat to beat interval (BBI), also known as the interbeat interval (IBI), or pulse to pulse interval (PPI) to derive Heart Rate Variability (HRV).
If this is required for your project, then select edit
in Continuous Background Data Collection. Then in Collect raw data from device select the data types you need to collect and the frequency of data collection. For example, if you require steps data every 30 secs then make sure that the steps Data Source is selected and set the Interval/Frequency of Recording is set to 30 seconds.

IMPORTANT NOTE: Choosing to collect Device Direct Physiological Data significantly impacts both device battery life and the time it will take participants to sync data to the PhysioQ Connect app. We therefore only recommend selecting Device Direct Physiological Data if this data is required for your project. For more advice on data collection for your project, please contact support@physioq.org and we will be happy to help.
Once you have set up your Tasks and chosen what type of physiological data to collect select DONE.
2.6 Start your project
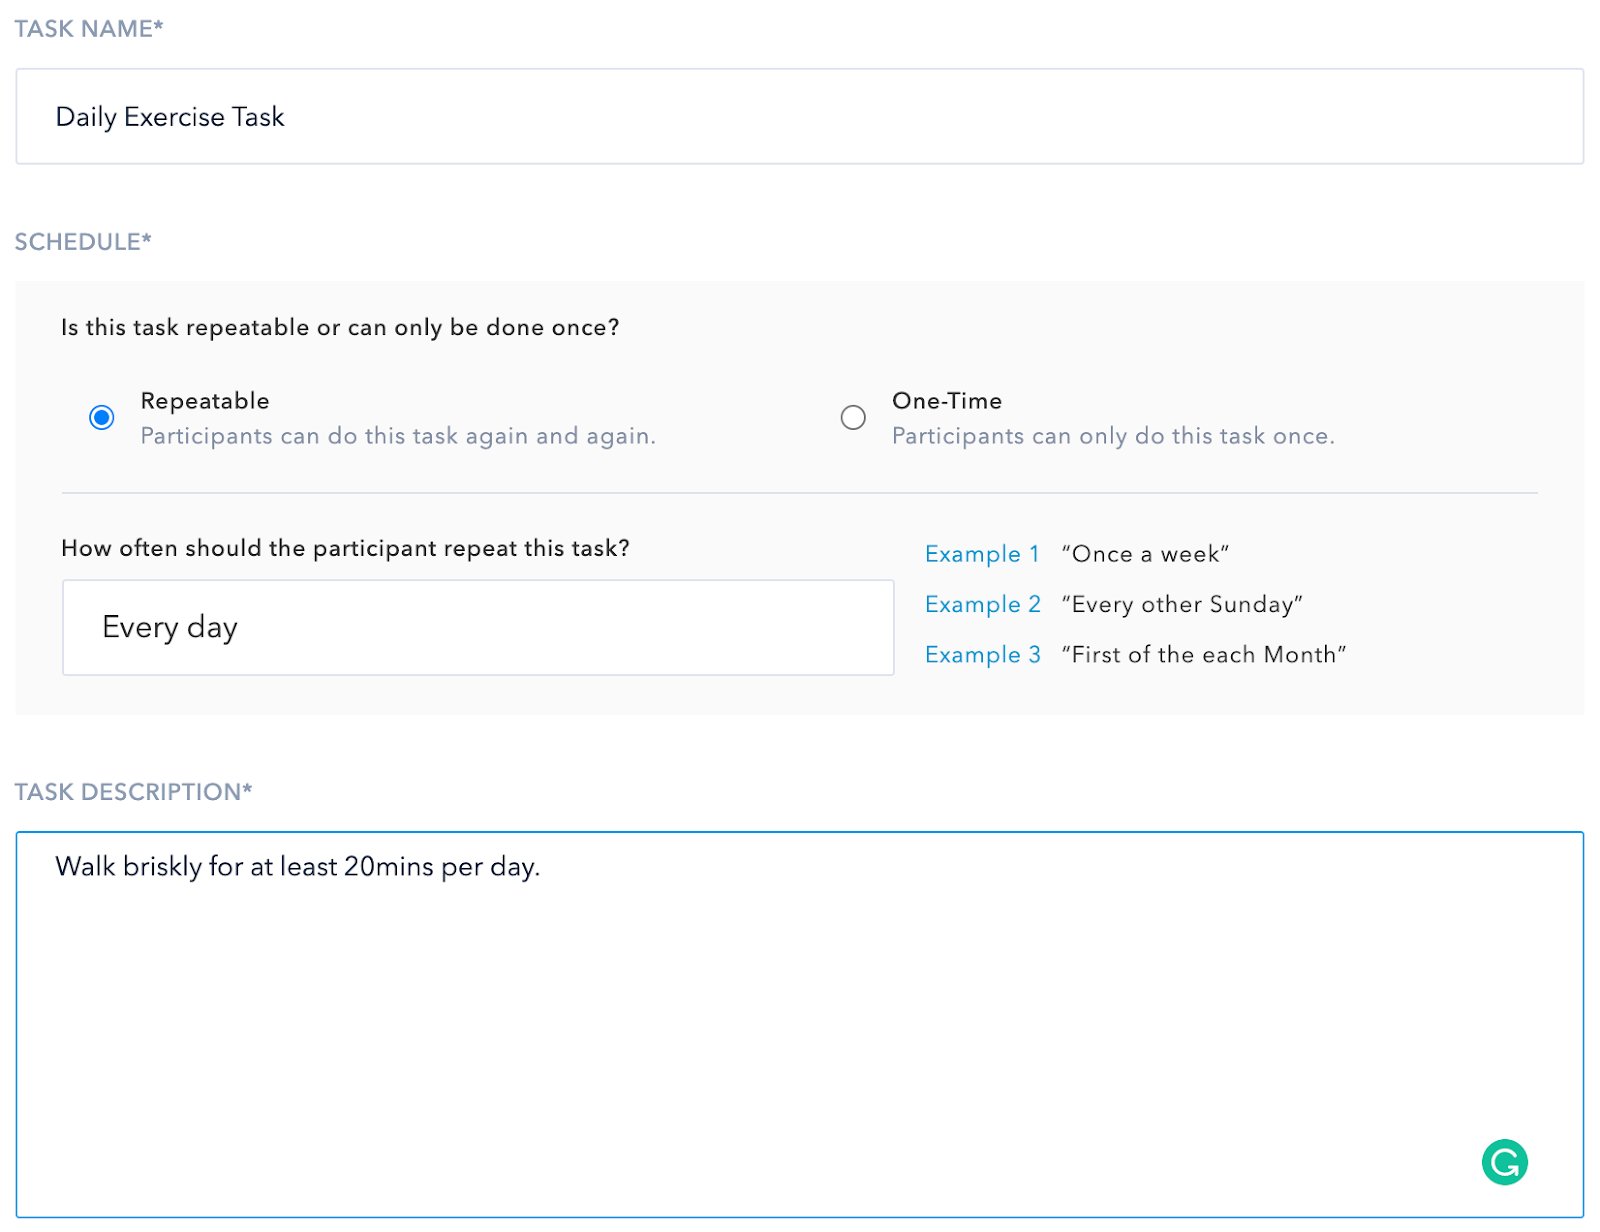
Now that you have set up your project, the final step is to test the participant experience, and if everything is OK, you can invite more participants to join the project.
Select NEXT: SIMULATE to start the project and generate a single participant Test Account.

Note: To NEXT: SIMULATE a project, you must have set the Project Details, selected Garmin Devices for physiological data collection, and have at least one Task. If you cannot select the NEXT: SIMULATE please check all steps in the project setup have been completed.
Download PhysioQ Connect - Download the PhysioQ Connect app for your smartphone, it is available on both the Android and iOS app stores.
Once you have installed and opened the app, you will be prompted to enter an Invite Code. You should enter the 4-digit code that has been generated for the Test Account. This will connect you with the application and allow you to test the participant experience.
If you are OK with the participant experience then select COMPLETE SETUP and move to the next step Inviting Participants. If you’d like to make changes to your project set up then select Back to revert your project to the setup stage.
3. Inviting Participants
The final step to running your project is to add participants to the project, this will generate Invite Codes for all participants which must be distributed to each participant. The participants will need the following to connect to your project and start collecting physiological data:
- Their unique Invite Code (generated in LabFront and distributed by the researcher)
- A Garmin wearable device such as the Garmin vívosmart 4 or Garmin VenuSQ
- The Garmin Connect app, available for download on Android and iOS app stores
- The PhysioQ Connect app, available for download on Android and iOS app stores
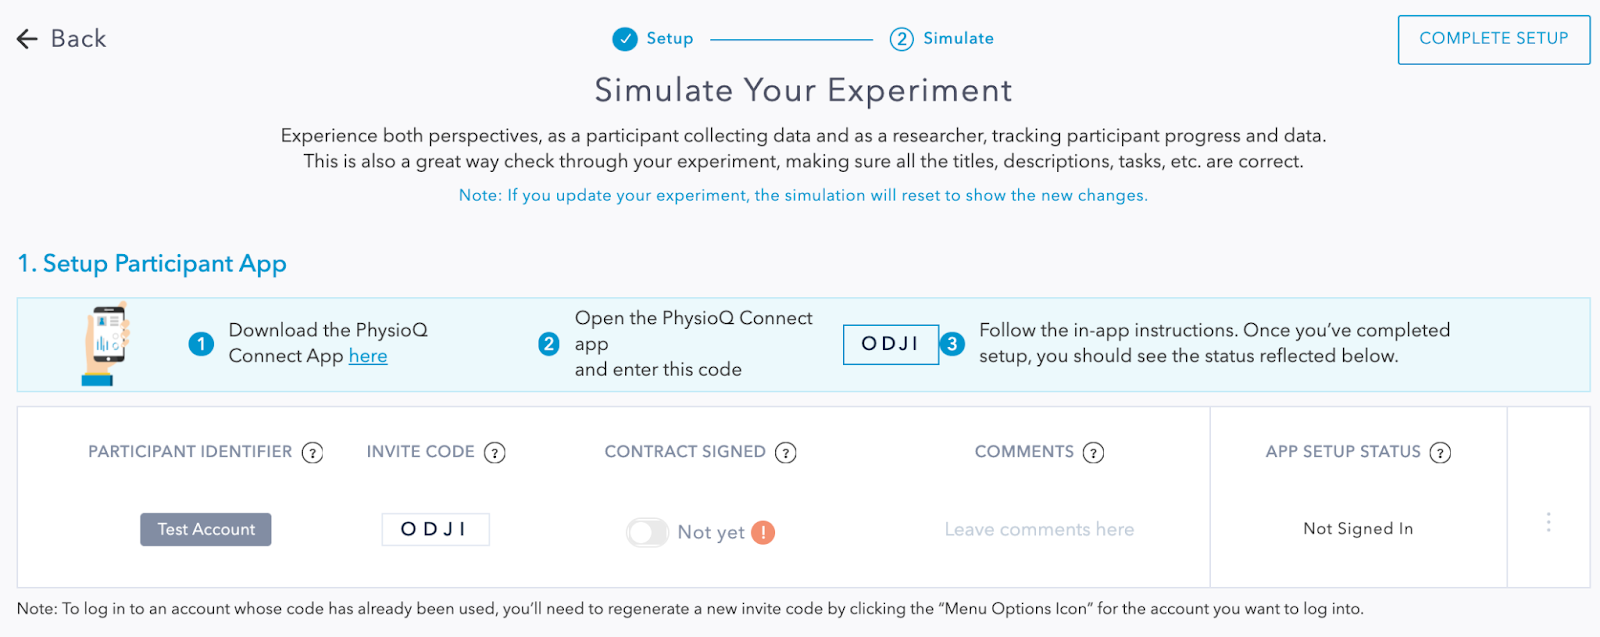
3.1 Add Participants
To add Participants to your project select Participants then Add Participants.
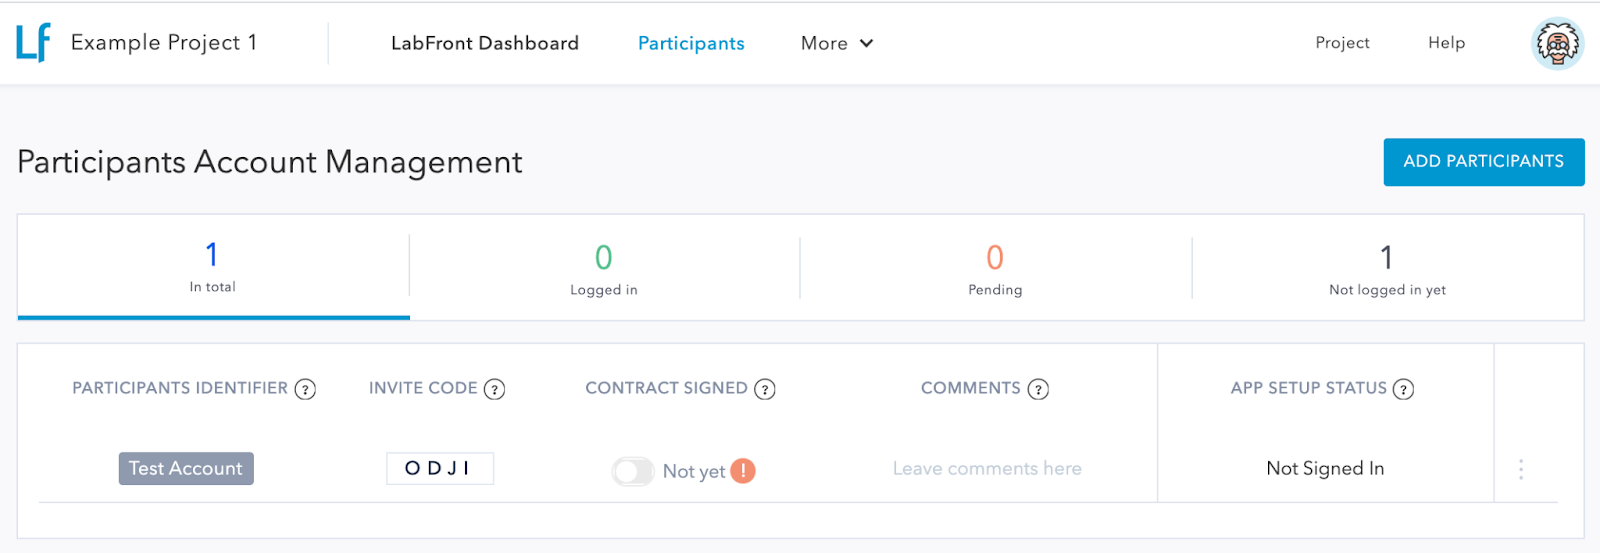
Enter the number of participants you would like to add and select ADD.
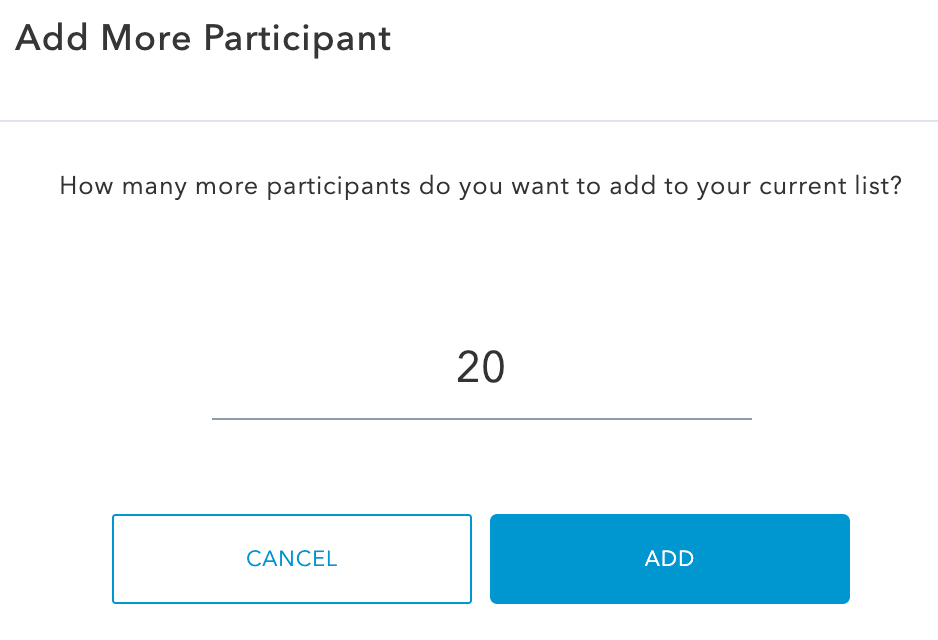
Note: Free Accounts have a 1 participant limit, to invite more than 1 participant to a project you will need a Basic or Advanced Account. To apply for a Basic or Advanced Account please contact partnerships@physioq.org and we will be happy to help.
3.2 Set participant descriptions
We recommend updating the descriptions for PARTICIPANTS IDENTIFIER and COMMENTS with a unique and anonymous identifier.

IMPORTANT NOTE: Please do not use personally identifiable information to identify each of your participants. This should be an identifier that only you as a researcher can use to uniquely identify each participant.
We also recommend updating the CONTRACT SIGNED to acknowledge that your participants have signed an Informed Consent form (provided separately by you as the researcher).

The APP SETUP STATUS indicates whether or not a participant has signed in to your project and will be updated automatically once each participant signs in with their Invite Code.
3.3 Distributing Invite Codes
The INVITE CODE is a unique 4-digit code for each participant. As a researcher, you must distribute these codes to each of your participants. Each participant must enter the 4-digit code into the PhysioQ Connect app to connect them to your project - see the Garmin Connect and PhysioQ Connect (for Participants) section for more details.
NOTE: If a participant signs out of the application you can generate new codes by selecting Regenerate Invite Code from the 3 dots menu on the right-hand side.
3.4 Garmin Connect and PhysioQ Connect (for Participants)
The final stage in running a project is to make sure the Participants are set up correctly. For this participants need to do the following:
- Invite Code - Received their unique Invite Code (generated in LabFront and distributed by the researcher)
- Garmin Connect - Download and install the Garmin Connect app, available for download on Android and iOS app stores
- Once Garmin Connect is installed, each participant must create a Garmin Connect account and make sure they have signed in to Garmin Connect.
- Paired their Garmin wearable device such as the Garmin vívosmart 4 or Garmin VenuSQ in the Garmin Connect app.
- PhysioQ Connect - Download and install the PhysioQ Connect app, available for download on Android and iOS app stores
- Once PhysioQ Connect is installed, each participant must enter their Invite Code to connect with the project.
- Paired their Garmin wearable device such as the Garmin vívosmart 4 or Garmin VenuSQ in the PhysioQ Connect app, including:
- Completing the Garmin Cloud authorization, by signing in and authorizing their Garmin account to share data with PhysioQ.
- Completing the Device Direct pairing (only applicable if Device Direct physiological data is being collected, not applicable for Garmin Connect only data collection)
NOTE: LabFront works best if you complete the Garmin Connect app set up before you set up PhysioQ Connect. If you have any issues with Bluetooth pairing we recommend the following:
- Disconnect/Unpair your wearable from both Garmin Connect and PhysioQ Connect apps.
- Disconnect/Unpair/Forget your wearable in your OS Bluetooth settings
- Reset your wearable device (data can be retained).
- Complete the above pairing steps again first with Garmin Connect, and then PhysioQ Connect.
4. Monitoring Participant Adherence
One of LabFront’s most valuable features is to be able to monitor your participants through the project to ensure Tasks are being performed and that data is being collected.
At any time during your project, you can sign in to LabFront and check if participants have connected with your project if tasks have been completed, and make sure that physiological data is being collected. You can also directly download all of the physiological and survey data to analyze the participant’s data.
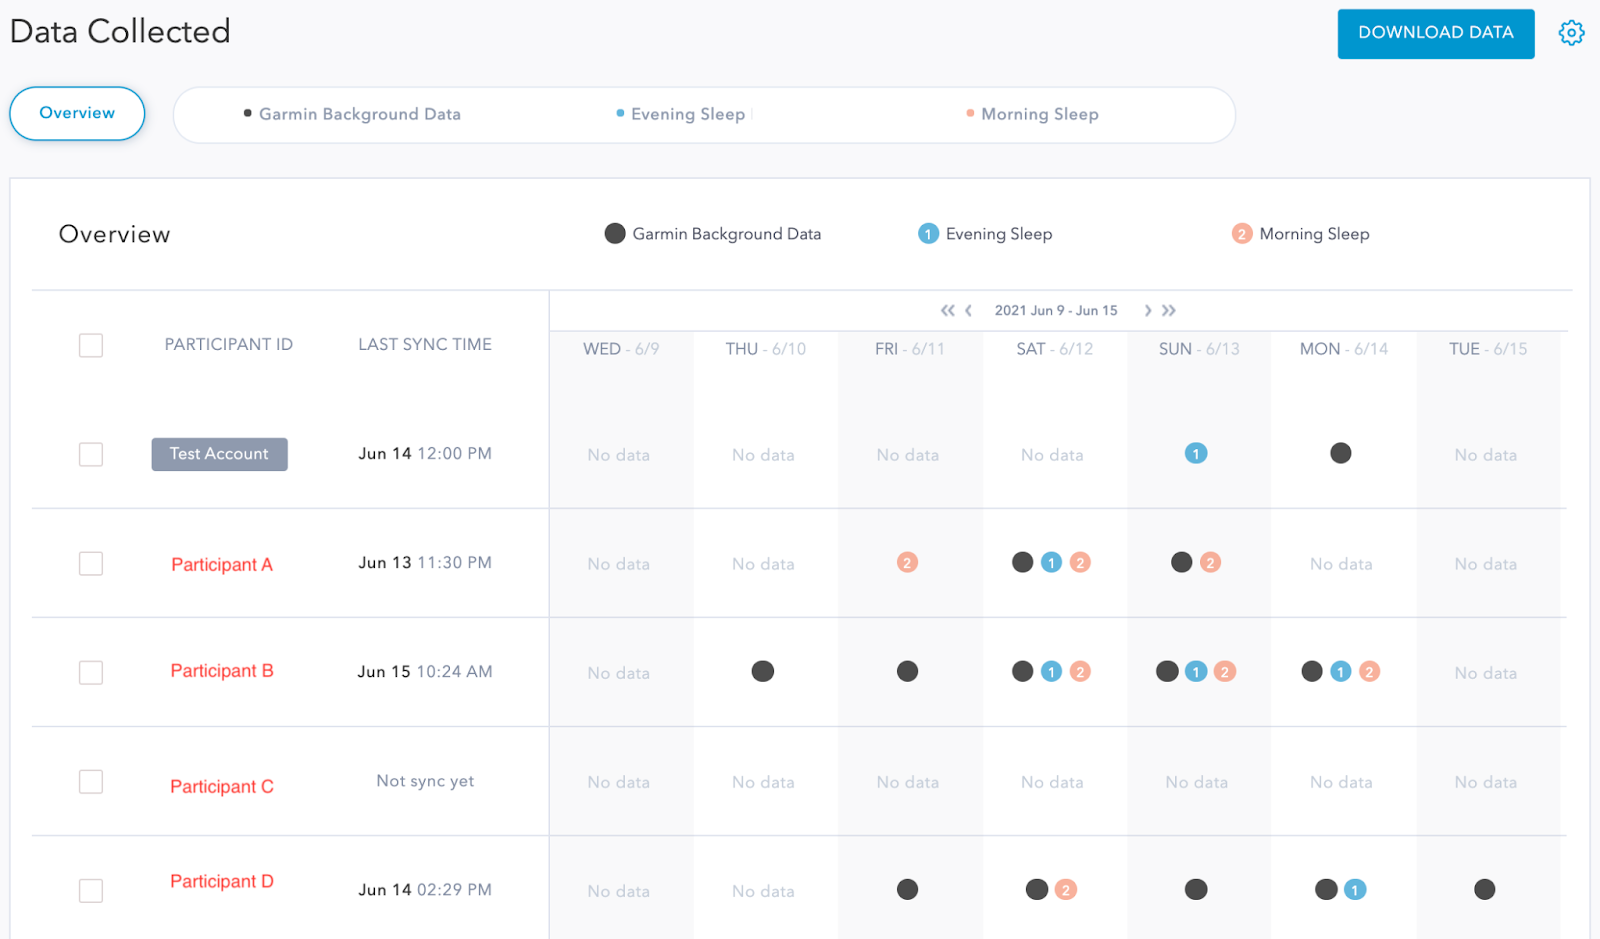
4.1 Using the Dashboard to monitor participants
The Dashboard shows important information regarding the participants and data collection. It’s a great tool to ensure adherence and make timely interventions.
Participant Status provides information about whether your participants have successfully connected with the project.
Data Collection provides a day-by-day view of what tasks have been completed by participants and what data has been collected. It’s an opportunity for researchers to view at a glance if the project is progressing smoothly. You can also download data directly from this Dashboard.
4.2 Downloading Data
Select DOWNLOAD DATA to instantly download all data collected for your project. This will create a single zip file of all physiological and survey data as JSON, CSV, and TXT files. You can unzip the file and open the data files in your preferred application such as Microsoft Excel or Matlab. To make the data easy to analyze, we’ve organized it by day and for each participant. For more information about the data please see Understanding the Data.

5. Understanding the Data
LabFront creates a single zip file for each day that your project is running. The data collected is based on your project setup and which devices have been used to collect the data (some data types are not supported by all wearables). The availability of data for each participant will depend on the participant having worn their device correctly and synced data regularly.
Within each daily zip file (organized by date), the data is separated by data types - Task data (Survey or Task data), Garmin Connect data, and Sensor Data (Direct Device physiological data).
All collected data is time-stamped so you can identify exactly when the data is collected, Task completed or Survey submitted.
5.1 Task (Survey) Data (if applicable)
For each Survey, the submitted data is available as individual JSON, TXT, or CSV files. Each file contains all submissions of that Survey for a particular day.
5.2 Garmin Connect Data (if applicable)
Garmin Connect data includes both individual JSON files for the following data formats and a single CSV file which includes all data types listed below. Within the CSV file, each row represents one data recording.
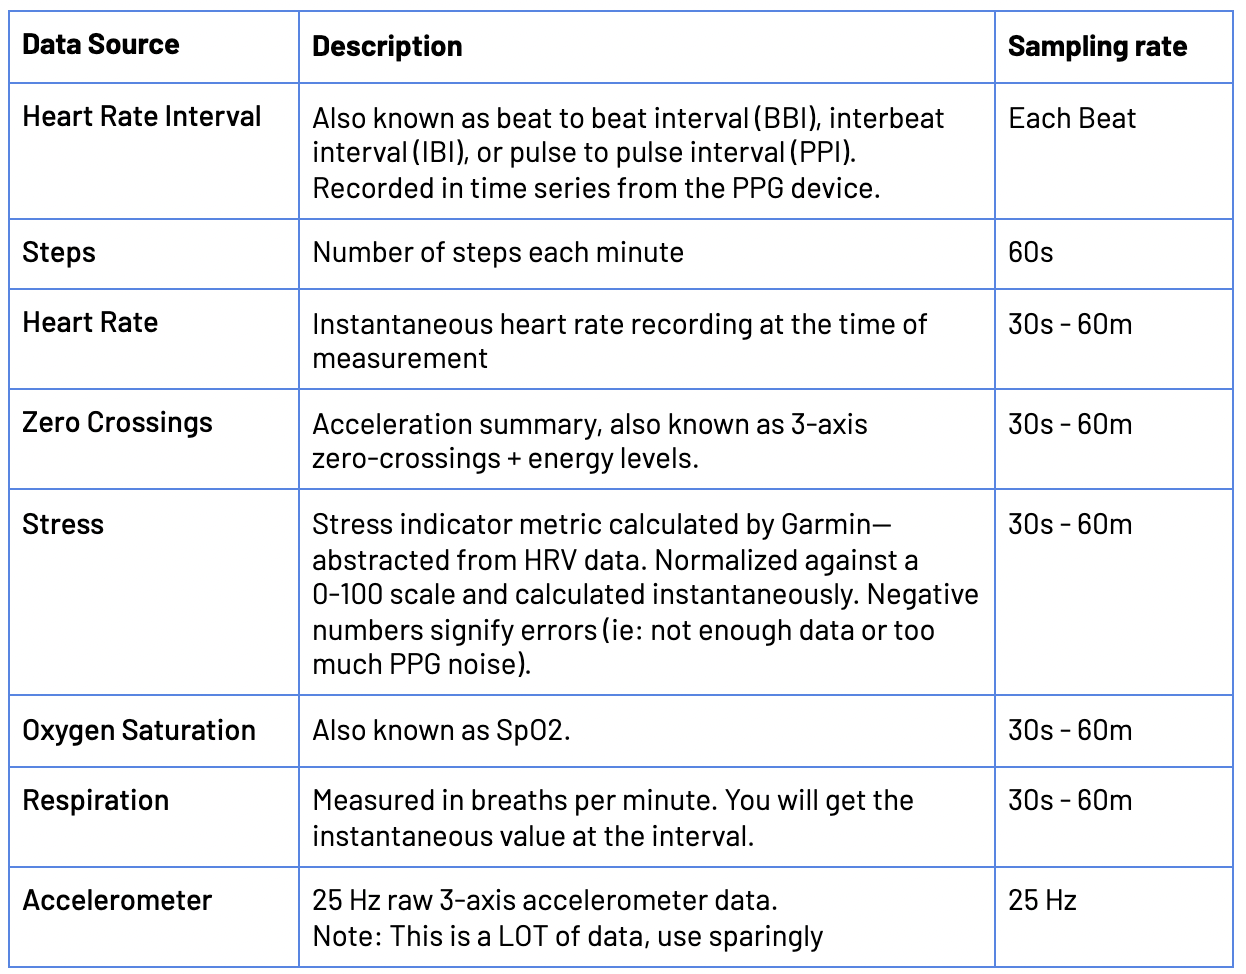
5.3 Device Direct Data (if applicable)
Direct Device data includes both individual TXT files for the following data formats and a single CSV file which includes all data types listed below. Within the CSV file, each row represents one data recording. The collection sampling rate (how often data is collected) is according to your project setup.